i think its tits there are no good aftermarket bumpers out there for fires every one i see i would have to hack all the goudy scoops and body lines off so i say *bomb diggity*


WAYDERS wrote:thats hardly any body work lol
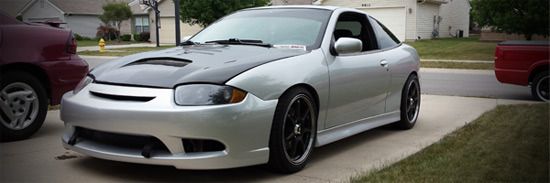
Is it me or by teh wheel well does the bumper look like it has to angle inward to meet up with the sunfire bumper? like /
Just looks like some extra epoxy may need to be used to kind of help fill that in and make it more of a contoured transition into the bumper.
eitherway man, this is just awesome. Cant wait for the finished product.
z yaaaa wrote:how are you guys planning on bonding the plastic together?
They make 2 part epoxies just for this sort of thing.. well more for fixing bumpers, 3M has a nice line of epoxy for plastic that we use all the time. This would be just like fixing a crack in a bumper, so you can use it in bonding the two pieces together... grind both sides of the bumper, use their mesh on the backside and apply the epoxy to bond the inside and the mesh gives it more added strength. Then flip it over and apply it on the front side and get rid of your seam, then you can sand and feather it into the original bumper.. Not to bad to do. alias did the same thing when he modded the IF front bumper for 2k headlights.
Looks amazing. I'm subscribed...I want to see this through

x2 with every post in here...really nice work so far! i really like the look now...

Stephen (manta z) wrote:WAYDERS wrote:thats hardly any body work lol
Is it me or by teh wheel well does the bumper look like it has to angle inward to meet up with the sunfire bumper? like /
Just looks like some extra epoxy may need to be used to kind of help fill that in and make it more of a contoured transition into the bumper.
eitherway man, this is just awesome. Cant wait for the finished product.
z yaaaa wrote:how are you guys planning on bonding the plastic together?
They make 2 part epoxies just for this sort of thing.. well more for fixing bumpers, 3M has a nice line of epoxy for plastic that we use all the time. This would be just like fixing a crack in a bumper, so you can use it in bonding the two pieces together... grind both sides of the bumper, use their mesh on the backside and apply the epoxy to bond the inside and the mesh gives it more added strength. Then flip it over and apply it on the front side and get rid of your seam, then you can sand and feather it into the original bumper.. Not to bad to do. alias did the same thing when he modded the IF front bumper for 2k headlights.
ya, thats what im using, 3m 2 part epoxy glue for plastic....best stuff around. we use it all the time at work aswell.
and actually the cavalier bumper was a little bit wide/longer so it sticks past the sunfire bumper about 1/8th of an inch in the wheel well part. nothing a little grinding and epoxying wont fix

That looks great! Can't wait to see the finished product
Member of J-body of Michigan.
Thats PURDY! Very nice cant wait to see the results

lookin sweet. i hope it lines up well after it's finished.
my carDomain updated 10/31/09 Forged and Supercharged


Sweet! Gary, I love how you like to do completely original things with your car, it really sets it apart from mostly all the cars on this site. Lots of respect, can't wait to see it all finished and painted!

" To study and not think is a waste. To think and not study is dangerous. "
Dave Dunsmoor wrote:Sweet! Gary, I love how YOU like to do completely original things with your car, it really sets it apart from mostly all the cars on this site. Lots of respect, can't wait to see it all finished and painted!
you mean WAYDERS right? lol
Hey now hey now, it was my idea, and it took me a while to convince you into this one lol...
the shop i work at dose mostly 1930-1970's stuff....i work with metal, and fiberglass when the mood strikes me.....i'll leave this plastic shenanigans to you wayde lol, you get paid so shut up and sand bish or ur motor aint going back in lol
@!#$ty run, but having some fun non-the less before she completely goes away for the winter...
http://s57.photobucket.com/albums/g204/garys_blue_05/?action=view¤t=001-21.flv
maybe it's just me, but im not feeling it. props on the attempt and the work, but it just doesn't look like its going to flow well. IDK, maybe i don't have the foresight to see the end, but i just don't like it. But i do appreciate the work, and i am looking forward to seeing the end. maybe i am wrong. just looks bad to me right now. Keep it up tho, i am definately intrigued.

you are doing good things Wayde. I know this will look good and Gary, despite the minor hiccup with that fugly bomex kit or whatever it was, but crisis averted and all for the better car looks superb and this rear will finish it off beautifully, notice i said finish, needs nothing else once this is done exterior-wise IMO.

sndsgood wrote:now that the cat is out of the bag, keep us updated with pics and how its going, i miss good build pic posts. im interested to see how its going to end up. which plate filler piece are you going to fill the top or the bottom? id say shave the top to put the plate down low and really change the look.
I was thinking the same thing.

Fusor 142 would work wonders for this kind of bond. Has a 10 minute work time before it hardens so there's little to no down time in between sanding. Good start and good luck
 http://nwgme.org
I like it alot!!!
really cant wait to see how it looks finished!
the car has always looked great though!

Sexy! Keep us updated with the progress.
If you guys want to make one that fits 00-02's, i'd be down for it...with dual exit of course.

Thrice . wrote:If you guys want to make one that fits 00-02's, i'd be down for it...with dual exit of course.
you would have to fully destroy an extreme tuner rear to do it.
im interested to see how the while thing pulls together...